
Introduction to Japanese Egg Sandwich
The Japanese Egg Sandwich, known as tamago sando, is a delightful choice for anyone seeking the perfect balance of flavor and comfort in a homemade meal. Imagine sinking your teeth into fluffy layers of creamy egg salad, all sandwiched between two slices of soft, airy shokupan (Japanese milk bread). It's a delightful alternative to traditional sandwiches, bringing a uniquely Japanese twist to a classic dish.
Why the Japanese Egg Sandwich is the Perfect Choice for Homemade Goodness
One of the best things about the Japanese egg sandwich is its simplicity. With just a few ingredients, including eggs, Kewpie mayonnaise, and your favorite spices, you can whip up a satisfying snack or lunch in no time! Plus, the use of shokupan elevates the experience with its delicate sweetness and texture that you just can't find in regular bread. This delicious treat is reminiscent of the beloved sandwiches found in Japanese convenience stores, offering an authentic taste of Japan right in your kitchen.
Crafting your own version allows for endless variations—whether you prefer a classic creamy egg salad or decide to experiment with soft-boiled eggs, your culinary creativity can shine through. So, are you ready to embrace this flavor-packed indulgence? Let’s dive into the recipe that will take your sandwich game to a whole new level! For more on the cultural significance of tamago sando, check out this insightful article on Japanese cuisine from NPR.
Ingredients for Japanese Egg Sandwich
Classic Egg Sandwich Ingredients
To create this delightful, creamy Japanese egg sandwich, you'll need:
- 2 large eggs: Perfectly boiled for a classic egg salad texture.
- 1 tablespoon + 1 teaspoon Kewpie mayonnaise: This creamy Japanese mayo adds richness.
- ⅛ teaspoon sugar: Balances the flavors beautifully.
- 1 teaspoon ketchup (optional): For a hint of sweetness.
- ⅛ teaspoon nutmeg (optional): A unique twist that elevates the taste.
- ⅛ teaspoon MSG (optional): Enhances umami flavors.
- ⅛ teaspoon salt: Essential for bringing all the flavors together.
- ⅛ teaspoon freshly cracked black pepper: A dash of spice.
- 2 slices of shokupan (8-slice count preferred): The soft, fluffy bread that makes this sandwich special.
- Butter, for spreading: Ensures a nice, toasty finish.
Soft Boiled Egg Sandwich Ingredients
For a unique take on the tamago sando, these ingredients will create a delicious soft boiled egg sandwich:
- 4 large eggs: Two hard-boiled and two soft-boiled for that perfect texture contrast.
- 1 tablespoon + 1 teaspoon Kewpie mayonnaise: Just like the classic version, it provides creaminess.
- ⅛ teaspoon sugar: Sweetness brings harmony to the savory elements.
- 1 teaspoon ketchup (optional): Adds a fun flavor twist.
- ⅛ teaspoon nutmeg (optional): A surprising aromatic touch.
- ⅛ teaspoon MSG (optional): Gives that extra depth of flavor.
- ⅛ teaspoon salt: Essential for seasoning.
- ⅛ teaspoon freshly cracked black pepper: For a hint of heat.
- 2 slices of shokupan (6-slice count preferred): The softer, slightly thicker bread enhances the overall mouthfeel.
- Butter, for spreading: Perfect for that rich taste and crunch.
Whether you choose the classic or the soft-boiled version, these ingredients will come together to create the ultimate Japanese egg sandwich experience. Happy cooking!
Preparing the Japanese Egg Sandwich
Making a delicious Japanese Egg Sandwich (Tamago Sando) at home is a breeze! With just a few easy steps, you’ll find yourself enjoying this creamy, eggy goodness that’s reminiscent of a cozy corner café in Tokyo. Let’s dive in!
Boil the Eggs
First up, start with the eggs! Depending on your chosen sandwich version—classic or soft-boiled—you'll want to boil the right number of eggs. For the classic sandwich, you’ll need two large eggs. Place your eggs in a pot, cover them with cold water, and bring it to a gentle boil. Once boiling, reduce the heat and simmer for about 10-12 minutes for hard-boiled perfection. Afterward, swiftly transfer the eggs to an ice water bath to halt the cooking process. This makes peeling a cinch!
Prepare the Egg Salad
Once your eggs are cooled, it’s time to whip up that egg salad. Carefully peel the shells and separate the yolks from the whites of your hard-boiled eggs. In a mixing bowl, mash the yolks with Kewpie mayonnaise, a touch of sugar, a pinch of salt, and a sprinkle of pepper for that savory kick. Want to elevate the flavor? Consider adding a hint of ketchup, nutmeg, or even a dash of MSG, depending on your taste preferences. Finally, chop the egg whites finely and fold them into your creamy yolk mixture to create a delightful texture.
Assemble the Sandwich
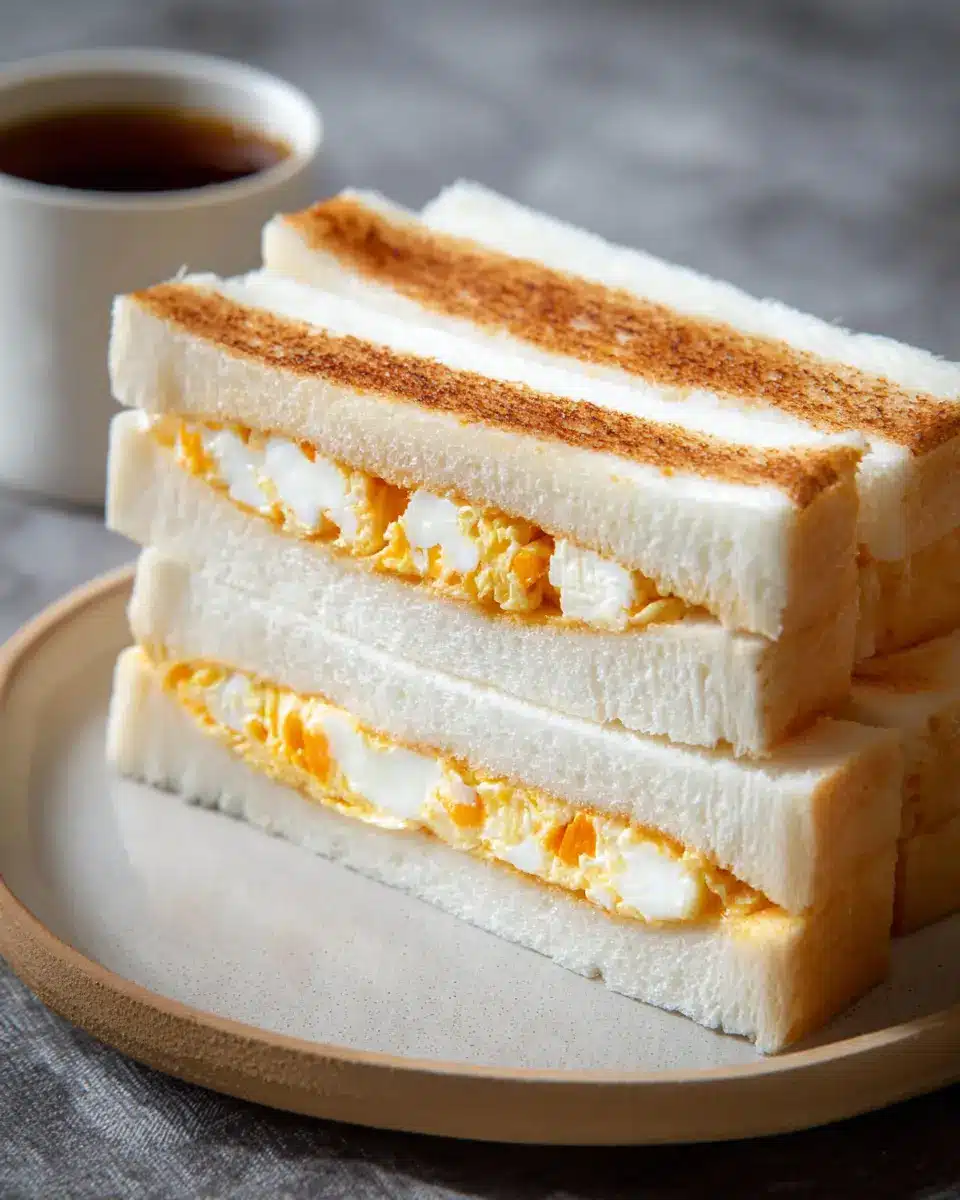
Now, it’s time for assembly! Grab two slices of soft, fluffy shokupan (Japanese milk bread) and remove the crusts for that classic aesthetic. Slather one side of each slice with butter—this adds richness and enhances flavor. Spread a generous layer of your egg salad onto one slice, concentrating a bit more in the center for a lovely cross-section. Then, top it with the other slice, butter side down.
Wrap & Rest
Before indulging in your Japanese Egg Sandwich, wrap it tightly in plastic wrap or parchment paper. Letting it rest for about 5 minutes will help meld the flavors and keep everything together during slicing—trust me, it’s worth the wait!
Slice & Serve
Finally, grab a sharp knife and slice through the sandwich, ideally down the center. The beautiful cross-section revealing the creamy filling is oh-so-inviting! Serve your sandwich immediately, perhaps with a side of pickles or some greens, and relish the deliciousness you’ve created right at home.
For more insights on sandwich preparations, check out seriouseats.com for some culinary inspiration!

Variations on the Japanese Egg Sandwich
Classic Creamy Egg Salad Variation
The Japanese Egg Sandwich is delightful on its own, but let’s talk about the classic creamy egg salad variation. For this take, hard-boiled eggs are mashed with rich, velvety Kewpie mayonnaise, a hint of sugar, and a dash of pepper, creating an incredibly satisfying spread. If you’re feeling adventurous, consider adding a splash of ketchup or a sprinkle of nutmeg for extra flavor. This variation is simple, creamy, and the perfect complement to soft Japanese milk bread, making it a go-to lunch option for busy weekdays.
Runny Soft-Boiled Egg Variation
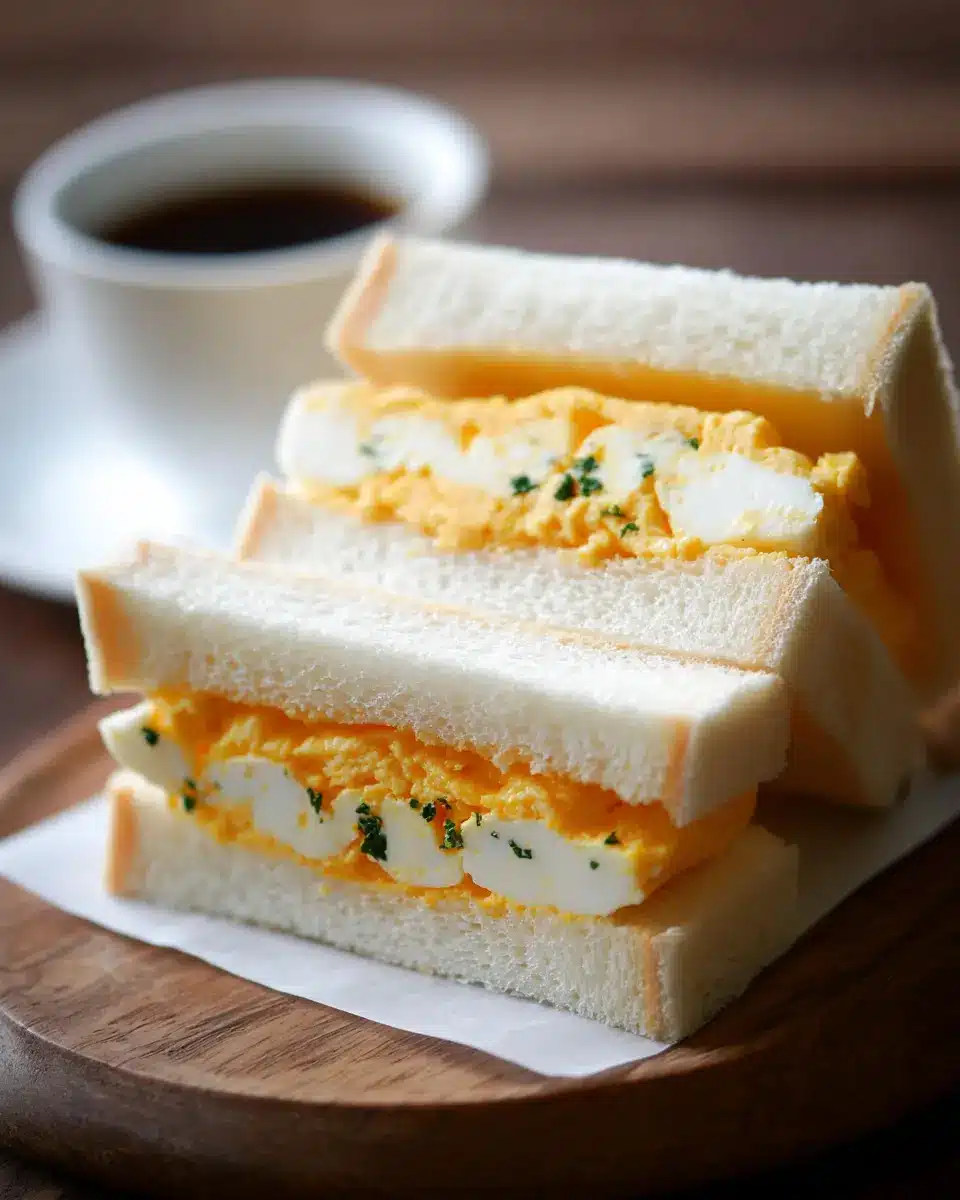
For those who enjoy a bit of drama in their sandwiches, the runny soft-boiled egg variation is a must-try. This approach features both hard-boiled and soft-boiled eggs, melding textures and flavors wonderfully. When you slice into the sandwich, the yolk spills out, creating a rich and indulgent experience. The luscious yolk pairs beautifully with the creamy egg salad base, and the shokupan provides the ideal backdrop. Whether you’re at home or packing lunch for work, this variation transforms a humble sandwich into a gourmet treat.
Cooking Tips for the Perfect Japanese Egg Sandwich
Choosing the Right Bread
To achieve the ultimate Japanese Egg Sandwich, opt for fluffy shokupan, the quintessential Japanese milk bread. Its soft texture and slight sweetness provide a perfect canvas for the creamy egg filling. If you can’t find shokupan, look for thick-cut white bread that’s soft and has a slight chew.
The Importance of Kewpie Mayo
Kewpie mayonnaise is a game-changer in this recipe. Unlike regular mayo, it’s made with egg yolks and has a uniquely rich, umami flavor that's often described as addictive. This ingredient elevates your egg salad, ensuring each bite of your Japanese Egg Sandwich is deliciously creamy and satisfying. Don’t skimp on it!
Serving Suggestions for Your Japanese Egg Sandwich
Best Pairings for a Complete Meal
To elevate your Japanese Egg Sandwich experience, consider pairing it with a refreshing green salad or a side of miso soup. The light, umami-rich flavors will complement the creaminess of the egg salad beautifully. For a heartier option, you might enjoy it alongside some crispy Turkey Bacon or Chicken Ham for a satisfying protein boost. Don’t forget to sip on some iced matcha or a chilled fruit-infused tea to enhance your meal’s refreshing vibe!
Creative Presentation Ideas
Transform your Japanese Egg Sandwich into a visually stunning dish by slicing it into elegant triangles and serving it on a wooden platter. You can garnish with fresh herbs or edible flowers for an artistic touch. For a casual brunch setting, consider wrapping your sandwiches in colorful parchment paper with twine for that rustic feel. This small detail adds charm and makes it perfect for sharing with friends! Check out more creative sandwich ideas on Serious Eats or Bon Appétit.
Time Breakdown for Japanese Egg Sandwich
Preparation Time
Get ready to whip up your delicious Japanese Egg Sandwich in just 20 minutes! During this time, you’ll be boiling the eggs, preparing your tasty filling, and getting your shokupan ready.
Cooking Time
The cooking time is a quick 4 minutes, perfectly allowing those eggs to transform into a creamy, flavorful filling that's a game-changer for your sandwich experience.
Total Time
In total, you’ll spend about 24 minutes creating this delightful snack or lunch option. That’s less time than your average coffee run! With this easy recipe, you can indulge in the authentic flavors of a Japanese Egg Sandwich right in your kitchen.
For more insights on Japanese culinary delights and the ever-popular Kewpie mayonnaise, check out Japan Centre. Not only will you enjoy the sandwich, but you might also find inspiration for your next meal adventure!
Nutritional Facts for Japanese Egg Sandwich
Calories
One serving of the Japanese Egg Sandwich packs approximately 451 calories. This makes it a satisfying option, whether you're enjoying it for lunch or as a snack.
Protein
You can expect around 17 grams of protein per sandwich. The eggs provide a great source of high-quality protein, making this dish a nourishing choice for energy throughout your day.
Sodium
With about 730 mg of sodium, it's advisable to be mindful of your overall intake, especially if you have dietary restrictions. Pairing it with fresh vegetables can balance the flavors and add even more nutrients.
For a deeper understanding of nutrition, check out resources like the USDA FoodData Central for extensive details on food composition.
FAQs about the Japanese Egg Sandwich (Tamago Sando)
What is the origin of Tamago Sando?
The Japanese egg sandwich, or tamago sando, originates from Japan's vibrant convenience store culture. It became popular in the post-war era as a quick, portable meal, often found in bento boxes. Today, its creamy and flavorful profile makes it a beloved snack for all ages. The use of fluffy shokupan, or Japanese milk bread, adds to its unique texture, setting it apart from traditional egg sandwiches.
Can I make the sandwich ahead of time?
Absolutely! The Japanese egg sandwich is perfect for meal prep. You can prepare the egg salad in advance and assemble the sandwich just before serving. Wrapped tightly in plastic or parchment paper, it stays fresh in the fridge for up to a day. Just keep in mind that the bread may soften slightly, but the flavors will still shine through!
What are some great sides with Tamago Sando?
Pair your tamago sando with sides like a crisp cucumber salad, a bowl of miso soup, or even some light pickles for a refreshing complement. If you’re looking for something sweet, a fruit salad or a simple dessert like mochi can round off your meal beautifully. Enjoy your culinary adventure!
Conclusion on the Japanese Egg Sandwich
The Japanese Egg Sandwich, or tamago sando, is not just a meal; it's an experience that elevates any snack time or lunch break. With its creamy texture and delightful flavors, this sandwich truly embodies the heart of Japanese convenience food. Try it today and bring a taste of Japan to your table!

Japanese Egg Sandwich (Tamago Sando) タマゴサンド
Equipment
- Stove
Ingredients
Classic Egg Sandwich
- 2 large eggs
- 1 tablespoon Kewpie mayonnaise plus 1 tsp
- ⅛ teaspoon sugar
- 1 teaspoon ketchup optional
- ⅛ teaspoon nutmeg optional
- ⅛ teaspoon MSG optional
- ⅛ teaspoon salt
- ⅛ teaspoon freshly cracked black pepper
- 2 slices shokupan 8-slice count preferred
- butter for spreading
Soft Boiled Egg Sandwich
- 4 large eggs
- 1 tablespoon Kewpie mayonnaise plus 1 teaspoon (20 g)
- ⅛ teaspoon sugar (1.6 g)
- 1 teaspoon ketchup optional (2.5 g)
- ⅛ teaspoon nutmeg optional
- ⅛ teaspoon MSG optional
- ⅛ teaspoon salt
- ⅛ teaspoon freshly cracked black pepper
- 2 slices shokupan 6-slice count preferred
- butter for spreading
Instructions
Classic Egg Sandwich
- Boil the Eggs: Hard boil the eggs, cool in ice water, and peel.
- Prepare the Egg Salad: Separate yolks and whites. Mash the yolks with mayo, sugar, ketchup, nutmeg, MSG, salt, and pepper. Finely chop the whites and fold them into the yolk mixture.
- Assemble the Sandwich: Remove crusts from the bread. Butter one side of each slice. Spread the egg salad on top of the bread, focusing slightly more on the middle for a nice cross section.
- Wrap & Rest: Wrap in plastic wrap tightly and let it rest for 5 minutes.
- Slice & Serve: Cut in half with a very sharp knife. Remove the plastic wrap and enjoy!
Soft Boiled Egg Sandwich
- Cook the Eggs: Soft boil 2 eggs and hard boil the remaining 2 eggs. Chill in ice water, then peel.
- Make the Egg Salad: Separate the yolks and whites of the hard-boiled eggs. In a bowl, mash the yolks with Kewpie mayo, sugar, ketchup, nutmeg, MSG, salt, and pepper until smooth. Chop the whites finely and fold into the yolk mixture.
- Assemble: Leave the crusts on. Butter one side of each slice of bread. Add a generous amount of egg salad to one slice, concentrating more in the center. Place the two soft-boiled eggs horizontally in the middle. Spoon more egg salad between the eggs, around and on top of the eggs to hold them in place. Top with the second slice of bread butter side down.
- Wrap & Rest: Wrap the sandwich tightly in parchment paper. Be sure to wrap it so that the eggs will be sliced in half when cutting the sandwich. Place a light plate (or something flat and light) on top and let rest for 5 minutes to help it hold its shape.
- Slice & Serve: Slice through the center (the tallest part) for the best cross-section. Serve immediately and enjoy!


Leave a Reply